Inline Deferreds in Twisted (Without Yield)

Introduction

By buffer of new stuff to blog about is getting low, so today I bring you something I played with a bit last year.

After being introduced to Twisted‘s inlineDeferred decorator, I decided to have some fun with that and byteplay. The result is a decorator that does the same as inlineDeferred, but without you having to use yields.

Warning

I know a Twisted developer. I showed him this code. He pasted it to other Twisted developers. The overwhelming response was one of horror. I think the horror was directed at the fact that the code makes things so magical. Use this code at your own peril.

How to use my code

The example below demonstrates how my code could be used.

from twisted.internet import defer, reactor, task

from async import async

def slowFunction(x=False):
    '''
    This is an example of a normal twisted function which returns a
    deferred.
    '''
    d = defer.Deferred()
    if x:
        reactor.callLater(2, d.errback, ValueError('x was '
                'true'))
    else:
        reactor.callLater(5.5, d.callback, 'twisted is awesome')
    return d

@async
def main():
    '''
    This is an example of an asynchronous function, where any calls which
    return defers appear to behave like normal functions.
    '''
    print slowFunction()
    try:
        print slowFunction(True)
    except ValueError, E:
        print repr(E)

    print 'The end.'
    reactor.callLater(1, reactor.stop)

# Start a timer to show that the demo is asynchronous.
def timer(_x=[0]):
    _x[0] += 1
    print _x[0]
task.LoopingCall(timer).start(1, False)

# Start the asynchronous function.
main()

reactor.run()

How it works

My module essentially goes through the byte-code of any function that you decorate with @async, and translates:

  • every function call foo(*args, **kwargs) into yield maybeDeferred(foo, *args, **kwargs)
  • every return statement return foo into returnValue(foo)

It then decorates the whole function with inlineDeferred and returns it. Note that this code will not work for functions which are already generators.

The dodgy bits

If you look at my code below, you’ll notice that it loads the functions maybeDeferred and returnValue into the global scope of the decorated function with the names _async_maybeDeferred and _async_returnValue. I couldn’t see any easy way of avoiding this. This means that any module that contains a function decorated with @async will magically have access to these functions. But it would be extremely bad practice to rely on this fact.

Prerequisites

To run my code you will need:

  • cPython 2.6
  • Twisted (duh!)
  • rfk’s promise module (because rfk has updated byteplay to work with cPython 2.6)

The code itself

This code is licensed under the MIT license. You may not use, modify, or distribute it unless you agree to the license. The code for async.py is listed below, or if you would like to download it, click here (zipped Python source including example code).

# Copyright (c) 2010 Joshua D. Bartlett
#
# Permission is hereby granted, free of charge, to any person obtaining a copy
# of this software and associated documentation files (the "Software"), to deal
# in the Software without restriction, including without limitation the rights
# to use, copy, modify, merge, publish, distribute, sublicense, and/or sell
# copies of the Software, and to permit persons to whom the Software is
# furnished to do so, subject to the following conditions:
#
# The above copyright notice and this permission notice shall be included in
# all copies or substantial portions of the Software.
#
# THE SOFTWARE IS PROVIDED "AS IS", WITHOUT WARRANTY OF ANY KIND, EXPRESS OR
# IMPLIED, INCLUDING BUT NOT LIMITED TO THE WARRANTIES OF MERCHANTABILITY,
# FITNESS FOR A PARTICULAR PURPOSE AND NONINFRINGEMENT. IN NO EVENT SHALL THE
# AUTHORS OR COPYRIGHT HOLDERS BE LIABLE FOR ANY CLAIM, DAMAGES OR OTHER
# LIABILITY, WHETHER IN AN ACTION OF CONTRACT, TORT OR OTHERWISE, ARISING FROM,
# OUT OF OR IN CONNECTION WITH THE SOFTWARE OR THE USE OR OTHER DEALINGS IN
# THE SOFTWARE.

import promise
from promise.byteplay import CO_GENERATOR
from twisted.internet.defer import maybeDeferred, returnValue, inlineCallbacks
import types

def async(x):
    if x.func_code.co_flags & CO_GENERATOR:
        raise TypeError('@async does not work on generators')

    code = promise.Code.from_code(x.func_code)

    for op, arg in code.code:
        if op == promise.CALL_FUNCTION:
            break
    else:
        # Doesn't call any functions, so don't touch it.
        return x

    i = len(code.code) - 1
    insert_positions = []
    stack = 1
    while i >= 0:
        op, arg = code.code[i]
        if op == promise.RETURN_VALUE:
            insert_positions.append((stack-1,
                    (promise.LOAD_GLOBAL, '_async_returnValue')))
            code.code.insert(i,   (promise.CALL_FUNCTION, 1))
            code.code.insert(i+1, (promise.POP_TOP, None))
            code.code.insert(i+2, (promise.LOAD_CONST, None))
        else:
            if op == promise.CALL_FUNCTION:
                insert_positions.append((stack-1,
                        (promise.LOAD_GLOBAL, '_async_maybeDeferred')))
                code.code[i] = (op, arg + 1)
                code.code.insert(i+1, (promise.YIELD_VALUE, None))
            try:
                pop, push = promise.getse(op, arg)
            except ValueError:
                pass
            else:
                stack = stack - push + pop

        while len(insert_positions) > 0 and stack == insert_positions[-1][0]:
            operation = insert_positions.pop()[1]
            code.code.insert(i, operation)
        i -= 1

    fn = types.FunctionType(code.to_code(), x.func_globals, x.func_name,
            x.func_defaults, x.func_closure)

    x.func_globals.setdefault('_async_returnValue', returnValue)
    x.func_globals.setdefault('_async_maybeDeferred', maybeDeferred)
    return inlineCallbacks(fn)
Posted in midlength | Tagged , , , , | Comments Off on Inline Deferreds in Twisted (Without Yield)

Pseudo Terminals in Python

Summary

In this post I’ll show you a Python script which becomes a pseudo terminal so that it can act as a man in the middle between your terminal emulator and a running process.  In my example, the Python script will:

  • spawn a child process (by default this will be a shell);
  • on start-up, detect the width and height of the window it’s in, and pass those details on to the child process;
  • catch signals from from its controlling terminal saying that the window has changed size, and pass the new details on to the child process;
  • detect when the child process tries to use the alternative screen buffer (this is what processes like Vim do), and inject some key presses as if the user had typed them; and
  • detect when the child process tries to return to the normal screen buffer (for example, by exiting Vim), and inject a different set of key presses.

What are pseudo terminals?

On Unix-based systems, running processes read from and write to streams for input and output. When a process wants to write to the terminal, it writes to the stdout stream. When a process wants to read input from the user, it reads from the stdin stream. A pseudo terminal basically intercepts the stdin and stdout streams of a process so that the process thinks that it is talking to the user via a terminal. Common examples of pseudo terminal programs are xterm and screen.

In Python, the pty module provides a few helpful functions related to pseudo terminals. I also found the development version of the docs helpful because it had an example.

Can’t I just use pipes?

No, you can’t. Of course, pseudo terminals do use pipes. But for terminals (and pseudo terminals), the kernel stores special information such as the window size of the terminal. If you just use pipes, a clever child process will be able to detect that its stdin and stdout streams are pipes and do not belong to a terminal. Some programs will change how they output results based on this fact.

Ok, show me the code

The code below is licensed under the MIT license. You may not use, modify, or distribute it unless you agree to the license. If you agree to the license and would like to download this example, click here (zipped Python source).

# Copyright (c) 2011 Joshua D. Bartlett
#
# Permission is hereby granted, free of charge, to any person obtaining a copy
# of this software and associated documentation files (the "Software"), to deal
# in the Software without restriction, including without limitation the rights
# to use, copy, modify, merge, publish, distribute, sublicense, and/or sell
# copies of the Software, and to permit persons to whom the Software is
# furnished to do so, subject to the following conditions:
#
# The above copyright notice and this permission notice shall be included in
# all copies or substantial portions of the Software.
#
# THE SOFTWARE IS PROVIDED "AS IS", WITHOUT WARRANTY OF ANY KIND, EXPRESS OR
# IMPLIED, INCLUDING BUT NOT LIMITED TO THE WARRANTIES OF MERCHANTABILITY,
# FITNESS FOR A PARTICULAR PURPOSE AND NONINFRINGEMENT. IN NO EVENT SHALL THE
# AUTHORS OR COPYRIGHT HOLDERS BE LIABLE FOR ANY CLAIM, DAMAGES OR OTHER
# LIABILITY, WHETHER IN AN ACTION OF CONTRACT, TORT OR OTHERWISE, ARISING FROM,
# OUT OF OR IN CONNECTION WITH THE SOFTWARE OR THE USE OR OTHER DEALINGS IN
# THE SOFTWARE.

import array
import fcntl
import os
import pty
import select
import signal
import sys
import termios
import tty

# The following escape codes are xterm codes.
# See http://rtfm.etla.org/xterm/ctlseq.html for more.
START_ALTERNATE_MODE = set('\x1b[?{0}h'.format(i) for i in
…       ('1049', '47', '1047'))
END_ALTERNATE_MODE = set('\x1b[?{0}l'.format(i) for i in
…       ('1049', '47', '1047'))
ALTERNATE_MODE_FLAGS = tuple(START_ALTERNATE_MODE) +
…       tuple(END_ALTERNATE_MODE)

def findlast(s, substrs):
    '''
    Finds whichever of the given substrings occurs last in the given string
    …       and returns that substring, or returns None if no such strings
    …       occur.
    '''
    i = -1
    result = None
    for substr in substrs:
        pos = s.rfind(substr)
        if pos > i:
            i = pos
            result = substr
    return result

class Interceptor(object):
    '''
    This class does the actual work of the pseudo terminal. The spawn()
    …       function is the main entrypoint.
    '''

    def __init__(self):
        self.master_fd = None

    def spawn(self, argv=None):
        '''
        Create a spawned process.
        Based on the code for pty.spawn().
        '''
        assert self.master_fd is None
        if not argv:
            argv = [os.environ['SHELL']]

        pid, master_fd = pty.fork()
        self.master_fd = master_fd
        if pid == pty.CHILD:
            os.execlp(argv[0], *argv)

        old_handler = signal.signal(signal.SIGWINCH, self._signal_winch)
        try:
            mode = tty.tcgetattr(pty.STDIN_FILENO)
            tty.setraw(pty.STDIN_FILENO)
            restore = 1
        except tty.error:    # This is the same as termios.error
            restore = 0
        self._init_fd()
        try:
            self._copy()
        except (IOError, OSError):
            if restore:
                tty.tcsetattr(pty.STDIN_FILENO, tty.TCSAFLUSH, mode)

        os.close(master_fd)
        self.master_fd = None
        signal.signal(signal.SIGWINCH, old_handler)

    def _init_fd(self):
        '''
        Called once when the pty is first set up.
        '''
        self._set_pty_size()

    def _signal_winch(self, signum, frame):
        '''
        Signal handler for SIGWINCH - window size has changed.
        '''
        self._set_pty_size()

    def _set_pty_size(self):
        '''
        Sets the window size of the child pty based on the window size of
        …       our own controlling terminal.
        '''
        assert self.master_fd is not None

        # Get the terminal size of the real terminal, set it on the
        …       pseudoterminal.
        buf = array.array('h', [0, 0, 0, 0])
        fcntl.ioctl(pty.STDOUT_FILENO, termios.TIOCGWINSZ, buf, True)
        fcntl.ioctl(self.master_fd, termios.TIOCSWINSZ, buf)

    def _copy(self):
        '''
        Main select loop. Passes all data to self.master_read() or
        …       self.stdin_read().
        '''
        assert self.master_fd is not None
        master_fd = self.master_fd
        while 1:
            try:
                rfds, wfds, xfds = select.select([master_fd,
                …       pty.STDIN_FILENO], [], [])
            except select.error, e:
                if e[0] == 4:   # Interrupted system call.
                    continue

            if master_fd in rfds:
                data = os.read(self.master_fd, 1024)
                self.master_read(data)
            if pty.STDIN_FILENO in rfds:
                data = os.read(pty.STDIN_FILENO, 1024)
                self.stdin_read(data)

    def write_stdout(self, data):
        '''
        Writes to stdout as if the child process had written the data.
        '''
        os.write(pty.STDOUT_FILENO, data)

    def write_master(self, data):
        '''
        Writes to the child process from its controlling terminal.
        '''
        master_fd = self.master_fd
        assert master_fd is not None
        while data != '':
            n = os.write(master_fd, data)
            data = data[n:]

    def master_read(self, data):
        '''
        Called when there is data to be sent from the child process back to
        …       the user.
        '''
        flag = findlast(data, ALTERNATE_MODE_FLAGS)
        if flag is not None:
            if flag in START_ALTERNATE_MODE:
                # This code is executed when the child process switches the
                …       terminal into alternate mode. The line below
                …       assumes that the user has opened vim, and writes a
                …       message.
                self.write_master('IEntering special mode.\x1b')
            elif flag in END_ALTERNATE_MODE:
                # This code is executed when the child process switches the
                …       terminal back out of alternate mode. The line below
                …       assumes that the user has returned to the command
                …       prompt.
                self.write_master('echo "Leaving special mode."\r')
        self.write_stdout(data)

    def stdin_read(self, data):
        '''
        Called when there is data to be sent from the user/controlling
        …       terminal down to the child process.
        '''
        self.write_master(data)

if __name__ == '__main__':
    i = Interceptor()
    i.write_stdout('\nThe dream has begun.\n')
    i.spawn(sys.argv[1:])
    i.write_stdout('\nThe dream is (probably) over.\n')

Useful links

Here are some resources which I found useful when writing this example:

Posted in long | Tagged , , | 2 Comments

Python: Context-Sensitive Formatting

Introduction

Python’s new string formatting syntax, introduced in Python 2.6, provides many advantages over the old %-based formatting.  I’ve set out to extend this string formatting, in order to help developers avoid making silly mistakes like forgetting to quote special characters in URLs or html.

Python string formatting—a quick summary

If you’re familiar with Python’s old %-based string formatting, pretend you’re not. Forget about it. Let me introduce you to Python string formatting the way it’s done today.

To specify a template for string substitution, I use curly braces to delimit fields. To perform the substitution and formatting, I use the format() method.

>>> template = 'Did you know that {name} likes to {action} on {day}?'
>>> print template.format(name='J. D. Bartlett',
...         action='publish blog posts', day='Mondays')
Did you know that J. D. Bartlett likes to publish blog posts on Mondays?

If I don’t want to use keywords to specify the parameters, I can use numbers instead of names in the curly braces. (In Python 2.7+ you can even omit the numbers and just use {}.)

>>> template = 'Perhaps {0} > {1}.'
>>> print template.format(17, 6)
Perhaps 17 > 6.

If I want to specify format details, I put them after a colon in the field definition.

>>> print '{num:7.3g}'.format(num=10.0)
     10

To do a str() or repr() of the object before formatting it, I use !s or !r. I can also specify things like alignment and padding in the format description. For instance, the following example takes the repr() of the text 'foo', centres it in a field of 15 characters, and uses underscores for padding.

>>> print '{txt!r:_^15}'.format(txt='foo')
_____'foo'_____

For more details, see PEP 3101 or the Python documentation for format strings.

My changes

The formattools module which I’ve written defines a number of tools that extend this string formatting.

Define string-based types

I said earlier that my module would help programmers avoid silly mistakes like forgetting to correctly escape a string. Lets take the example where we’re generating html code and we want to make sure we don’t accidentally leave the code vulnerable to JavaScript injection attacks.

The first thing we would do is to define a string-based type which represents html code.

import cgi
from formattools import TextBased, PlainText

class Html(TextBased):
    @classmethod
    def _convert_from_(cls, other):
        if isinstance(other, PlainText):
            other = raw(other)
        if isinstance(other, (str, unicode)):
            return Html(cgi.escape(other))
        raise NotImplementedError

    @staticmethod
    def valid_raw_text(text):
        return True

In the class definition above, the _convert_from_ class method says that if we try to insert plain text into some html, the text needs to be escaped using cgi.escape(). The valid_raw_text static method says that any raw text is valid html. We won’t worry about details of what is and isn’t valid html just yet.

Now we can construct Html and PlainText objects.

>>> text1 = Html('<b>Hello there</b>')
>>> text2 = PlainText('I think that 3 < 5')

The formattools module provides two special functions. The convert() function tries to convert an object to another type. The raw() function returns the raw text of an object where applicable. These are made to mimic built-in functions like repr() and len() in that they call special methods (_convert_to_, _convert_from_ and _raw_; note the single leading and trailing underscores). This is done so that any object may be defined to take advantage of these functions, even if that object does not inherit from TextBased.

>>> from formattools import convert, raw
>>> text1
Html('<b>Hello there</b>')
>>> raw(text1)
'<b>Hello there</b>'
>>> raw(text2)
'I think that 3 < 5'
>>> convert(text2, Html)
Html('I think that 3 &lt; 5')

Note that calling convert(text1, PlainText) will not work because we have not defined how to convert html into plain text. In fact, it should not work, because in general, html code is not plain text.

Use string-based types as format templates

If we use a string-based type, such as our Html type, as a format template, formattools will automatically make sure that the things we substitute are compatible. For example:

>>> template = Html('<i>{text}</i>')
>>> template.format(text=text2)
Html('<i>I think that 3 &lt; 5</i>')

>>> t2 = PlainText('I {text} you.')
>>> t2.format(text=text1)
Traceback (most recent call last):
 File "<stdin>", line 1, in <module>
 ⋮
TypeError: Html('<b>Hello there</b>') cannot be automatically
…   converted to PlainText

This is all quite neat, and does pretty much what you would expect.

“But,” I hear you ask, “what if I want to substitute html code without it being escaped?”
Why you simply substitute an Html object. For instance:

>>> template.format(text=text1)
Html('<i><b>Hello there</b></i>')

Because both template and text1 are Html objects, no conversion is performed.

Use any object as a format template

In case you want to define your own objects which act as format templates, formattools defines a class Formattable which defines the format() method. If you want your object to be able to act as a format template, you’ll need to define the _parse_format_() method and, optionally, the _finish_format_() method. I won’t go into detail here about what these functions need to do. Check out the docstrings on the functions for more details.

Explicit field types

Suppose we want to have a plain string template that contains some substitution fields that are Html format. The formattools module extends the syntax of field definitions to allow you to do this.

>>> from formattools import formatter
>>> formatter.registertype(Html, 'html')
>>> t3 = PlainText('If you want to write "{text}" in html, you write
 "{text:/html}".')
>>> print t3.format(text=text2)
If you want to write "I think that 3 < 5" in html, you write "I think that
   3 &lt; 5"

If you want to include format specifiers, just include them between the colon and the slash.

In the example code above, we’ve registered Html as a field type with the default formatter.  If you don’t want to register your field type with the default formatter, there’s still hope.  You can create your own formatter.

>>> from formattools import Formatter
>>> f = Formatter()
>>> f.registertype(Html, html)
>>> print f.format(t3, text=text2)
If you want to write "I think that 3 < 5" in html, you write "I think that
   3 &lt; 5"

Get the code

The formattools module is licensed under the MIT license.  You may not download, use, modify or redistribute this code unless you agree to the terms of the license. If you accept the license, you may download the module here (zipped Python source file).

Where to next?

For the adventurous, you could override the _parse_format_() method in your subclass of TextBased to perform rudimentary parsing of the template string in order to provide better default field types. For instance, if we create a template with our Html class, then by default all fields within the template are Html fields. But if we override _parse_format_() in the Html class, we could change the default field types of the substitution fields based on the context. For instance, we could make it so that Html('<a href="{link}">{link}</a>') behaved the same as Html('<a href="{link:/url}">{link/html}</a>'). Of course we’d have to define and register a field type for URLs.

Posted in long | Tagged , , , , , , | Comments Off on Python: Context-Sensitive Formatting

Vim and Breakindent

My contention: Programmers should never have to insert line breaks into long lines of code.

Why: The position of line breaks in long lines of code does not contain any semantic information.  Where coding standards limit line length, it is generally so that the code is easy to read by all developers, even when editing the file via a terminal.  I think that code should be easy to read for all developers regardless of their view settings, and that the ideal solution would use tools to make this so, rather than coding standards.

A step towards the solution: I often use Vim to edit Python files. Vim’s breakindent patch lets you edit files with long lines, with sensible wrapping based on the indentation of the original line.

Breakindent explained

Breakindent is a setting for Vim which means that wrapped lines have an indentation level starting at the indentation level of the line itself. Unfortunately, breakindent is not part of the standard Vim distribution.  I explain how to compile Vim with breakindent further on in this post.

The easiest way for me to demonstrate the use of breakindent is as follows.  Suppose I have a Python file whose contents are something like this:

class MyClass(object):
    def __init__(self, some_parameter_or_other):
        self.some_long_attribute = [i for i in some_parameter_or_other if
…i > 32768 and str(i) not in sys.argv]

Yes, that’s supposed to be one really long line. And the listing above is pretty much what the file would look like in Vim with the Vim settings linebreak on (break lines at word endings) and showbreak=…. If you want to have the ellipses for your showbreak, you do need to be using a version of Vim with unicode support.
Now suppose I have a version of Vim that has been compiled with the breakindent patch. If I turn the breakindent option on, all of a sudden the example looks like this:

class MyClass(object):
    def __init__(self, some_parameter_or_other):
        self.some_long_attribute = [i for i in some_parameter_or_other if
        …i > 32768 and str(i) not in sys.argv]

Notice that the long line wraps to the same indentation as the beginning of the line. But I can go one step further and set showbreak=…\ \ \ \ \ \ \ (that’s ellipses followed by seven escaped spaces). This will mean that the file is displayed like this:

class MyClass(object):
    def __init__(self, some_parameter_or_other):
        self.some_long_attribute = [i for i in some_parameter_or_other if
        …       i > 32768 and str(i) not in sys.argv]

I find that this makes the code look really neat no matter what the window width of my editor is. If you’re working in a team of course, you wouldn’t want to move to a standard of not breaking long lines until you’re sure that every member of your team has access to an editor that can do this sort of thing.

The Difficulty

On the face of it, breakindent seems to be a really useful option. The only thing that makes it less useful is that it doesn’t come with Vim. For quite a while Vim’s TODO help has included the following line:

-   Patch for 'breakindent' option: repeat indent for wrapped
    line. (Vaclav Smilauer, 2004 Sep 13, fix Oct 31, update 2007
    May 30)

And for quite a while the idea of finding a patch compatible with a recent version of Vim, and then compiling Vim, seemed too daunting for me to worry about. But not so any more.

Compiling Vim with Breakindent

First you will need to get Eli Carter’s updated version of the breakindent patch from here. I used the version for Vim 7.2.315, but if there’s a newer version, you’re welcome to try it.

Next, you will need the Vim source code. (I assume you have mercurial installed.)

$ hg clone https://vim.googlecode.com/hg/ vim

Update the Vim repository to the tag that matches the version of the patch.

$ cd vim
$ hg update v7-2-315

Then apply the patch.

$ patch -p1 < vim-7.2-breakindent.patch

Edit src/Makefile and set whatever options you want. I chose to uncomment the following options:

CONF_ARGS = --enable-gui
CONF_OPT_PYTHON = --enable-pythoninterp
CONF_OPT_FEAT = --with-features=huge

If you want to compile Vim with the GUI, you will need to have one of several GUI packages installed. I compiled Vim with the GTK2 GUI in order to match the Ubuntu Vim I already had. It took me a while to figure out which package I had to install to get this working. In the end, it turned out to be libgtk2.0-dev (if I recall correctly), which should have been obvious except that it doesn’t show up in Syntaptic if you search for “gtk2”.
The rest of the compiling process is pretty much as you’d expect.

$ sudo apt-get install libgtk2.0-dev
$ make
$ sudo make install

(Edit: To compile with the Python interpreter you’ll need to install the python-dev and libssl-dev packages. If you get stuck while trying to include features, src/auto/config.log may have some useful debugging information.)

This will install to /usr/local/bin/vim by default, so you may need to change your vim / gvim aliases to point to this new location. If your distribution has its own default vim settings with things like set backspace=2 and syn on, you may need to set these in your .vimrc file.

Why Isn’t it Part of Vim?

The reason that the breakindent patch hasn’t been submitted to Bram for inclusion in Vim is simple: it still contains bugs. For instance, try selecting text in the second or subsequent row of a wrapped line.  Or try turning on the linebreak option and making a line so long that it wraps several times, then see what happens to your cursor.

Even with these bugs though, I find this patch extremely useful.

Posted in long | Tagged , , , , , , , , , | Comments Off on Vim and Breakindent

Import Graphs for Python

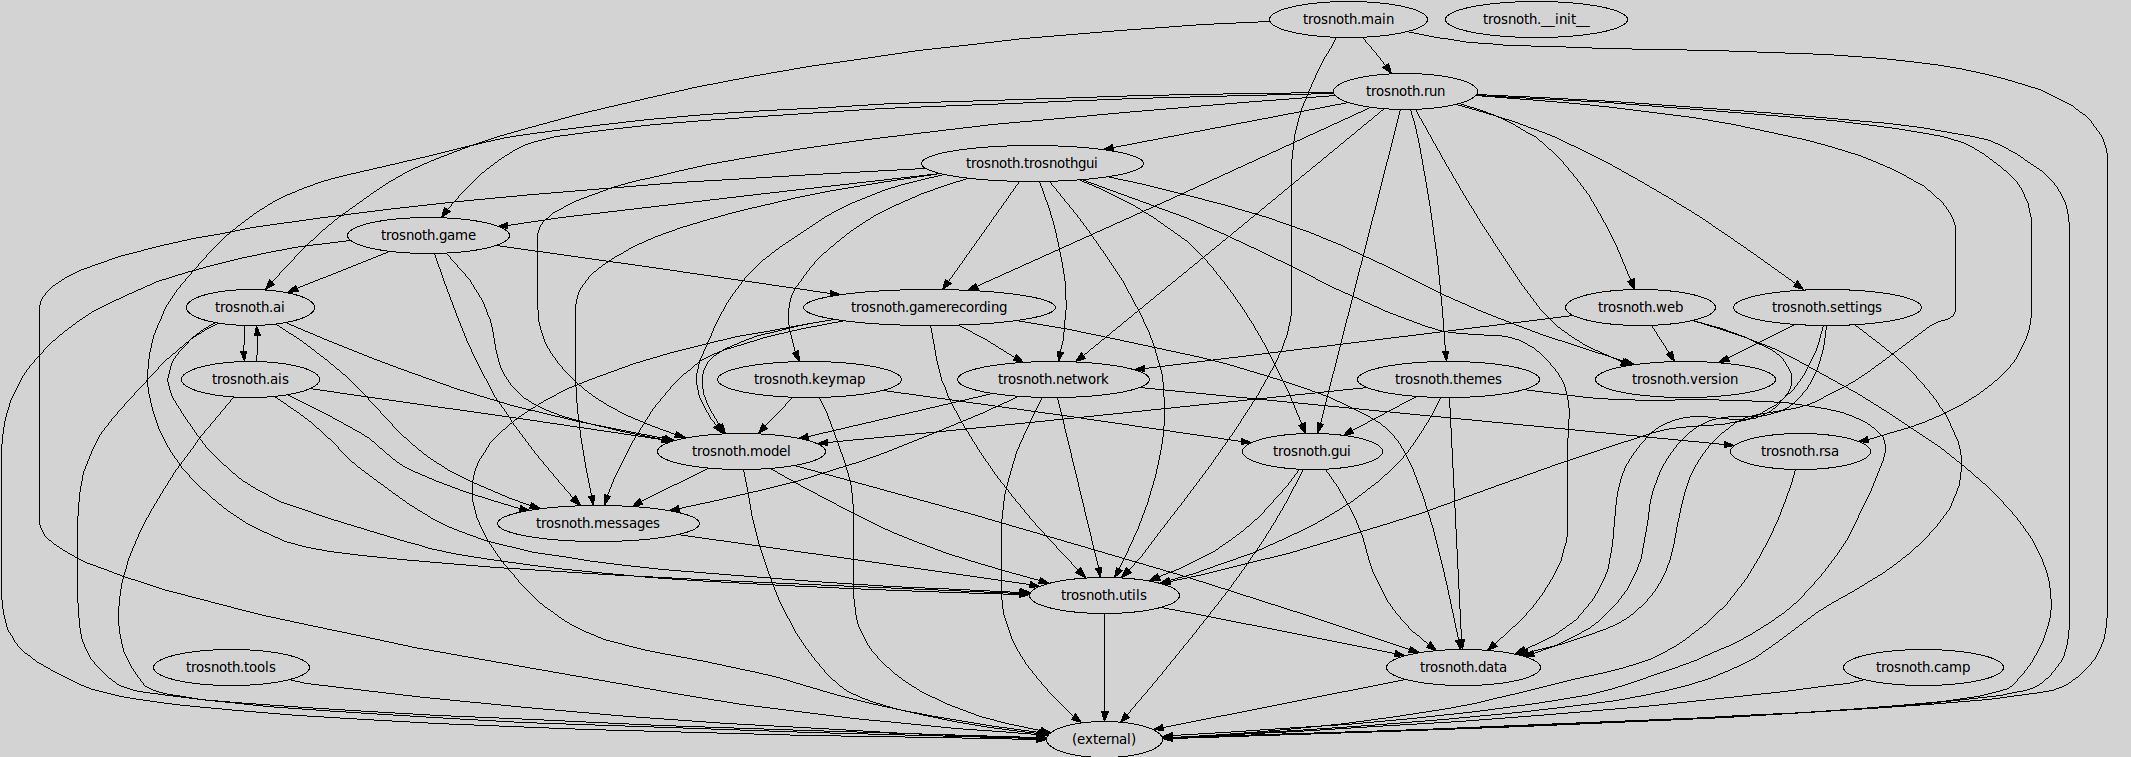
I was doing some Trosnoth refactoring recently, and I wanted a tool that would draw import graphs of the Trosnoth subpackages.  After a quick search of the Internet didn’t give me what I wanted, I set about to write my own import tools.

Tool Descriptions

  • catimports FILE – accepts the name of a Python file and prints all the modules imported by that file.
  • whoimports PACKAGE [path] – searches the given path (current directory by default) for Python files which import the given python package.
  • makegroup PACKAGE – generates a graph (output as a .dot file) of the imports within the given package or subpackage.

Example

$ catimports settings.py
os
pygame
trosnoth.data
trosnoth.utils
trosnoth.utils.unrepr
trosnoth.version

$ whoimports trosnoth.version
./settings.py
./trosnothgui/pregame/playscreen.py
./run/core.py
./trosnothgui/pregame/backdrop.py
./web/server.py
./trosnothgui/interface.py

$ python makegraph.py trosnoth
$ kgraphviewer imports.dot

The generated imports.dot graph looks something like this:

Import graph for trosnoth

How it Works

As of Python 2.6, the ast module gives us the ability to walk through the syntax trees of Python code.  The tools I wrote use this to find what imports are contained in each Python file.

Getting the Code

I have licensed the code under the MIT license.  If may not download, use, modify or redistribute the code unless you agree to the license.  The code may be downloaded here.

Posted in short | Tagged , , , , , , | Comments Off on Import Graphs for Python