How to cast the ‘free’ episode of Foundation to your TV from Android in 726 easy* steps

Based on a true story…

  1. In your Android browser, head to the Foundation page on the Apple TV website.
  2. Click ‘Play Free Episode’.
  3. You will be prompted to enter your email or Apple ID. You don’t have an Apple ID. Close the prompt and look around the page for a ‘Sign up’ button instead.
  4. There is no ‘Sign up’ button. Click ‘Play Free Episode’ again to show the login prompt again.
  5. Enter your email address and click ‘Continue’
  6. Create a password. Make sure you save it in an easy-to-use password manager because you’ll be needing this password a lot.
  7. You will be prompted to enter information like your name and date of birth. Enter it. You trust Apple, right?
  8. Apple will email you a verification code. Flip to your email app and copy the verification code to the clipboard. Swap back to your browser and try to paste the verification code.
  9. You can’t past the verification code because when your tried to long-press in the verification code boxes the input focus somehow moved to the ‘×Close’ button.
  10. Nothing you try using your device’s touch screen moves the input focus back to the verification code boxes.
  11. Attach a Bluetooth keyboard to your Android device and use the Tab and Ctrl+V to move the input focus back to the verification code boxes and paste the code.
  12. Apple asks you for billing information, but since you’re only watching the free episode, they don’t need that information. You can just close this page.
  13. Horay! You have successfully created an Apple ID. Now what did you need that for again?
  14. Navigate back to the Foundation page and click ‘Play Free Episode’.
  15. The episode will start playing on your Android device. Look for a button to cast it to your TV.
  16. There is no button to cast it to your TV. Do a Google search to find out how to cast Apple TV shows to your TV from Android.
  17. You can’t cast Apple TV shows to your TV from Android. Sorry. But it seems that, with the right app, you can play them directly on your Google TV.
  18. Grab the remote for your Google TV. Navigate to the ‘Apps’ page and search for the ‘Apple TV’ app. Install it.
  19. Launch the ‘Apple TV’ app.
  20. Use your Android device to scan the QR code on your TV screen.
  21. You will see a page asking you to log in to your Apple ID account. Enter your email address and password.
  22. You will see a message telling you that your account needs further setup. It will tell you to open your account on a new-enough iOS device, or to go to a different Apple website to set up your account.
  23. Your Android phone doesn’t have iOS on it. Click the link to go to the other Apple website.
  24. It’s not a link. You have to either copy and paste the domain name into your browser’s address bar, or type it in manually. Do so now.
  25. Enter your email address and Apple ID password. Again.
  26. You will see a page prompting you to give Apple your mobile phone number. Give it to them. After all, where’s the harm in giving a big tech corporation your phone number?
  27. Apple will send you a verification code, this time by SMS. Copy and paste it into the verification code boxes on your browser.
  28. Surprisingly, copy and pasting worked for this verification code! Congratulate yourself on avoiding the further pain of swapping back to your Bluetooth keyboard.
  29. You’re finished in this browser tab now. Close it and return to the other Apple website for activating the Apple TV app on your Google TV.
  30. Enter your email address and Apple ID password again.
  31. You will see a generic error message saying that something went wrong. This is probably because you took so long to activate the Apple TV app. You can’t expect them to wait forever while you’re messing around, can you?
  32. Grab your Google TV remote again. Close the Apple TV app and open it again.
  33. Scan the new QR code on your Android Device.
  34. You’ll see the same web page about activating your Apple TV app. Enter your email address and Apple ID password again.
  35. Apple will send you another verification code by SMS. Copy and paste this.
  36. Yay! You have successfully logged in to Apple TV on your Google TV.
  37. Use your Google TV remote to choose to play the free episode.
  38. You will see an error message saying that you are viewing this episode on too many other devices. Have you been trying to defraud Apple by letting all your friends and family use your account to watch this free episode on different devices at the same time? Shame on you!
  39. On your Android device, check that you have closed the tab that had the Foundation episode open. What, you already closed that? Oh.
  40. On your Android device, go to the Apple TV website and click the ‘Log out’ button. That should do it, surely.
  41. On your Google TV, try playing the free episode again.
  42. You will see the same error message. You’re already viewing this episode on too many other devices!
  43. You didn’t really need to watch it on your TV anyway, did you? Maybe you should just watch it in the browser on your Android device.
  44. On your Android device, browse back to the Apple TV website.
  45. You’ll need to log in again. Email address. Password. You should know the drill by now.
  46. Click ‘Play Free Episode’.
  47. You will see a message saying ‘An error occurred.’
  48. Give up and go to bed. Maybe you’ll have better luck tomorrow.


Posted in midlength | Tagged , , | Comments Off on How to cast the ‘free’ episode of Foundation to your TV from Android in 726 easy* steps

Trosnoth in 2022 (and beyond)

What’s been happening in the world of Trosnoth development?

Over the past year or so there have been some major Trosnoth developments, particularly in the user interface. A huge thank-you to Phedg1 for his contributions that gave these changes momentum.

Guns, Items, and the Shop Menu

When you capture zones and kill enemies in Trosnoth, you gain coins. You can spend these coins to buy various kinds of upgrades. In the early versions of Trosnoth this was a very clunky process. Over the years, we simplified this process, but it never quite felt ideal. A number of years ago, a group of Trosnoth developers and players brainstormed what their ideal system for upgrades would look like. Two parts of our imagined new system were allowing players to have multiple active upgrades at a time, and to not lose all their coins when they died. These changes were relatively simple, and we quickly implemented them, way back then.

Our imagined new system also involved a clear distinction between guns, which would only run out after a set number of shots had been fired, and other upgrades, which would last for a limited time. These improvements remained on the ‘to do’ list for years.

Buying a weapon using Phedg1’s new radial menu

About a year ago, Phedg1 submitted a set of patches which not only implemented these changes, but also added a shiny new radial menu for buying the various kinds of upgrades. It has made buying upgrades not only smoother, but also much easier for new players to discover without instructions.

New Upgrades

Until this past year, Trosnoth has never had more than nine available upgrades, so that they can be easily available with the hotkeys 1–9. With the new shop menu, this consideration is no longer important. So Phedg1 set about adding a rail gun, a terrain-piercing gun, mines, and a rather unpredictable gun called ‘Meandering Menace’ which is almost as likely to kill the firer as any enemy. In response, I was inspired to add a detonation beam for removing mines, and a ‘Threat Vision’ team boost that helps a team to notice enemy mines and ninjas.

Team boosts are back!

Team boosts are back in Trosnoth!

Speaking of team boosts, they are now back in Trosnoth! Having teams work together to buy upgrades has always been part of the plan for Trosnoth. It was implemented in the early versions of Trosnoth, but it proved too hard to use, and was removed pending user interface improvements. Those improvements are now here! When a player starts to buy Threat Vision or Minimap Disruption, the rest of the team can now see, and easily contribute coins to, the purchase. I’m delighted to have this back in Trosnoth, because it means that coins can be used for more than just personal gain.

New scenarios

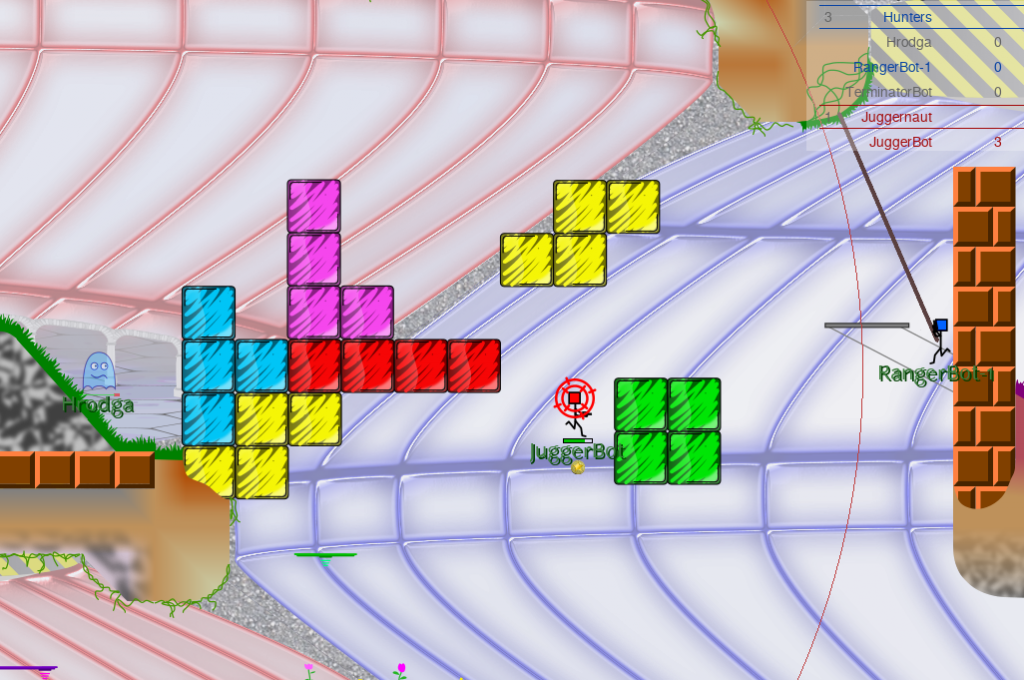
Phedg1 also contributed a new scenario called ‘Juggernaut’, in which one player is the juggernaut, and everyone else is trying to kill them. This may sound a bit like the existing Elephant King scenario, but there are a few key differences. For a start, the juggernaut gets four hit points instead of one. On top of this, the scenario ends when a player reaches 20 kills, and only the juggernaut can kill a non-juggernaut player. So it ends up having quite a different feel to Elephant King, and is a welcome addition.

Hunting the Juggernaut

I’ve also added a scenario called ‘Space Vampire’, which has proved quite popular. One player is selected as the space vampire, and starts with lots of coins and lots of hit points, and also gets to be invisible most of the time. The other players are space villagers, and need to either kill the space vampire, or survive until the time limit. To add suspense, the villagers have the minimap permanently disrupted. (Actually, it’s not quite as bad as a regular minimap disruption—players can use the minimap to see who owns which zones, but not where players are.)

Updated 1v1 rules

One piece of feedback we’ve had from player has been that 1v1 games were too unbalanced: whoever landed the first kill got a huge advantage because of the coins they would earn from the kill and the two zones they would then capture. So we’ve created a new set of rules that apply to 1v1 tournaments. This includes players having a shorter respawn time, so the enemy can usually only capture one zones per kill. It also does not award any coins for kills or zone captures, but awards coins more quickly for just being alive. These changes seem to have made 1v1 matches much less of a runaway victory for whomever lands the first kill.

What’s next?

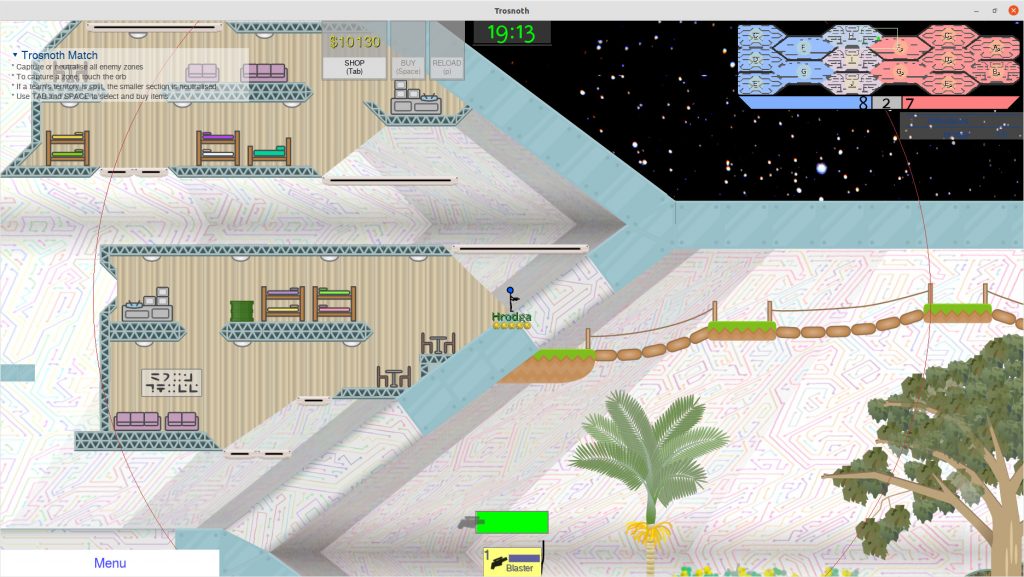
Over the past little while, I’ve been slowly chipping away at a Trosnoth version with slightly larger zones, and where zones thematically make sense together (as opposed to the current random hodge-podge of zones scenery). Apart from the aesthetic improvements this will bring to the game, I feel this will slow the game down a little bit, to counteract the increase in pace that we got when we introduced momentum-based physics a number of years back. In current Trosnoth, a speedy player can sometimes kill an enemy and capture two zones before that enemy can respawn, which I feel is a bit too much.

A taste of the up-and-coming Trosnoth graphics

While I’m looking forward to when this new improved Trosnoth version is ready, and I occasionally bring it out for play-testing, the completed version is still likely to be years away. That’s mostly because each new Trosnoth room needs to be designed and the artwork needs to be done, and of course it’s people like me doing this in our spare time. If you’re an artist and want to volunteer your time to help, I’d love to hear from you!

(We’ll also need to recode the bot path-finding a bit to fit the new rooms, but that’s an article for another day.)

In the meantime, there are plenty of improvements in the pipeline. We’re currently testing some changes that should improve the smoothness and playability of internet games when there are spikes in network latency. There are also some user interface improvements nearly ready for release. On top of this, we’d like to improve built-in support for tournaments through the Trosnoth server, so that tournament organisers don’t have to have separate spreadsheets for tournament standings and match-ups, but can choose to do that all through the server.

All in all, we’re very happy with where Trosnoth is at in terms of how much fun it is to play. We’re also happy with recent improvements which make the game easier for newcomers to pick up. Our current focii are polish, and improvements for server hosts and tournament organisers.

Posted in long | Tagged , | Comments Off on Trosnoth in 2022 (and beyond)

Free Mercurial hosting for open source projects on GitLab fork Heptapod

The Trosnoth source code has been kept in a Mercurial repository on BitBucket since not long after we migrated from Subversion many years ago. But BitBucket no longer supports Mercurial repositories: all existing Mercurial repositories on BitBucket will be shut down on 1 June.

So the Trosnoth source repository will soon be migrating to Heptapod. Heptapod is a ‘friendly fork’ of GitLab community edition, built with the purpose of bringing Mercurial support to GitLab. In January, Octobus and Clever Cloud announced that they were offering free Heptapod hosting to open source projects (within certain parameters). They have also said that they plan to offer commercial hosting for non-open-source projects soon.

Why not self-host the mercurial repository?

If all we wanted was somewhere to host the Trosnoth source code, we could easily have set up hosting on our own server, and linked it to a trac instance. In fact, that’s what we originally did before moving to BitBucket. The motivation for moving to BitBucket in the first place was to make public collaboration easier. Platforms like GitLab, GitHub, and BitBucket make the Trosnoth project easy to discover, and provide straightforward tools for contributing to it. In contrast, self-hosting the repository only provides the bare essentials for collaboration.

(These platforms also provide added bonuses like easy automated builds and testsTrosnoth used BitBucket Pipelines to run our test suite. But collaboration is the main draw-card for us.)

Why not migrate to Git?

When BitBucket announced they were shutting down Mercurial repositories, we seriously considered migrating the Trosnoth repository to Git. After all, Git has become the far more popular choice for distributed version control. This option could still be on the table if things change in the future, but for now, we’ve chosen to stick with Mercurial. Here are a few of our reasons:

It’s less effort. The easiest option is not always the best option. But in an open source project which nobody’s paid to work on, effort spent migrating to Git is effort that isn’t being spent improving and developing Trosnoth itself.

Mercurial is easy for newcomers. If you’re a software developer these days, the odds are that you’ll have to learn Git at some stage. But when we use Trosnoth as an example project for high school students, none of them have ever used version control software before, and some of them may never use it again. I want to give them a positive experience of version control, and Mercurial is very friendly to newcomers. (From what I’ve seen, Mercurial is sometimes confusing for those who’ve come from Git, but that’s mostly because ‘branch’ and ‘pull’ don’t mean what you expect them to mean.)

Converting from Mercurial to Git is lossy. You don’t lose a lot in the conversion. And it’s true, you can generally live without what you’ve lost. And people who really buy into Git’s philosophy tell me that most of what you lose in the conversion (e.g., branch name metadata on every changeset) is clutter that you don’t want to keep anyway. But I disagree. The main difference I’ve seen between Mercurial and Git is that Mercurial aims to record project history, while Git aims to record patches. This might seem like the same thing, but imagine this: you’ve spent months working on a rewrite to a major part of your project and in the end you decide to scrap your work. Maybe the original need is no longer as pressing, or perhaps you realise that your rewrite doesn’t add as much as you’d first hoped. So you get rid of your branch and move back to the main line. If you’re using Mercurial, the history of your ill-fated rewrite is still preserved, and you can go back and view it any time you like. If you’re using Git, all your changes are lost unless you take a deliberate action to preserve them (e.g., create a tag). I prefer Mercurial’s default behaviour, because I never know when I might want to reuse something I did in an old branch. Differences like this cause challenges when converting from Mercurial to Git: I have to make a conscious decision what to do with each closed branch during the conversion, and if I have closed heads within a branch things get even worse. And this brings us back to the first reason to stick with Mercurial: it’s less effort.

Sticking with Mercurial is good for the internet. I admit that this reason is a philosophical one, and wouldn’t hold much weight if all the practical pressures said we needed to convert to Git. But the truth is, it’s better for everyone when there are multiple choices available. Chrome gets better because it has to compete with Safari, Firefox and Edge. And over their histories, Git and Mercurial have both borrowed features from one another. If Mercurial dies out, Git will be the worse for it. So we have very few misgivings about sticking with the underdog here. Mercurial may not be the popular choice, but it has very few other disadvantages, and we commend Octobus for starting the Heptapod project and helping keep Mercurial alive.

Posted in long | Tagged , , , , , , | Comments Off on Free Mercurial hosting for open source projects on GitLab fork Heptapod

Fixing grub error about unsigned kernel in Ubuntu

Just a quick note in case someone else runs into the same issue as me: I have a machine running Ubuntu 18.04 (LTS), and in order to get some of the hardware working, I used ukuu to upgrade the kernel from the Ubuntu versions (4.15.0.xx.xx) to an upstream version (4.18.20).

At first this caused me no problems, but after a while, I started to run into the following message when trying to update packages:

Cannot upgrade Secure Boot enforcement policy due to unsigned kernels

Your system has UEFI Secure Boot enabled in firmware, and the following kernels present on your system are unsigned:

4.18.20-041820-generic

These kernels cannot be verified under Secure Boot. To ensure your system remains bootable, GRUB will not be upgraded on your disk until these kernels are removed or replaced with signed kernels.

What seems to be happening is that newer versions of grub enforce more secure booting policies, which is a good thing. The problem is that the upstream kernels aren’t signed with Ubuntu’s trusted keys.

When I googled for this problem the suggestions seemed to be disabling UEFI secure booting in the BIOS, or removing the kernels. Removing the kernels would break some of my hardware, and I didn’t want to disable the secure boot setting because I sometimes boot the machine to Windows and I really don’t want any malware inserting itself secretly into the Windows boot process (I don’t want this on Linux either, but any malware that has root permissions on my Linux boot has already won).

After I realised what I needed to actually google for, I found this Ubuntu blog article which explains how to create a machine owner key (MOK), set up Ubuntu to trust it, and sign things with it. I followed the steps described starting with “Certificates in shim” to generate and enrol a certificate. (You may be able to use update-secureboot-policy directly to create and enrol the certificate, but I didn’t discover that until I got to the end of the blog article, so I haven’t tried that way.)

It’s worth noting as you read that article that you do not want to include “1.3.6.1.4.1.2312.16.1.2” in the extendedKeyUsage of your certificate or you’ll only be able to sign kernel modules and not kernel themselves.

I then used sbsign as described in the article to sign /boot/vmlinuz-4.18.20-041820-generic. I moved the original to a different directory for safekeeping and replaced it with the signed version. (Keeping both versions side by side in /boot/ is a bad idea because grub will see both and still complain about having an unsigned one there.)

I then did two final steps:

sudo dpkg-reconfigure grub-pc

This causes grub to rebuild its menus. This is probably not strictly necessary because I didn’t actually add any new kernels to /boot/, but I thought it was worth running to make sure there weren’t any errors.

sudo dpkg --configure grub-efi-amd64-signed

This fixes the installation of the package that was broken. If all goes according to plan, it should no longer show an error.

Posted in midlength | Tagged , , , , | Comments Off on Fixing grub error about unsigned kernel in Ubuntu

Trosnoth Development Priority: Simple Server Deployment

Earlier this year, a volunteer on Übertweak tried to use Trosnoth on camp, but couldn’t work out how to run and configure a Trosnoth server. In the current version of Trosnoth, the server is not shipped in any easy-to-use bundle; instead, you must run the Trosnoth server from the source code. This effectively means that you need an expert present to run a Trosnoth server. If the person on camp with the motivation to run Trosnoth does not have the required expertise, it doesn’t work.

I consider this to be a major failure in Trosnoth. Trosnoth was created many years ago for use on Übertweak. If it can’t be easily used on camp, this is a problem.

Over the weekend, we released Trosnoth 1.13.0. This was a huge milestone, incorporating many months of work and completely overhauling some Trosnoth internals.

In January, I listed some upcoming Trosnoth development priorities, and said that I hadn’t yet decided on the importance of each priority. That has now changed. Now that version 1.13.0 is released, all other development priorities are on hold until we’ve fixed this shortcoming. The aim of the next release is to make it really easy to install, configure and run your own Trosnoth server, so that people can play Trosnoth at LANs or on camps without any specific technical knowledge.

Posted in short | Tagged , , | Comments Off on Trosnoth Development Priority: Simple Server Deployment